HDFS HA in Hadoop 2 turns the NameNode from a single master into an active/standby pair. Both nodes are configured with the same namespace, but only one is active and serving clients; the other stays in standby. They synchronize through a shared edit log stored either on NFS or on a JournalNode quorum using QJM. The active NameNode writes new edit records to its local edits file and to the shared store. The standby polls the shared store, reads the newest edits, merges them with its fsimage to create a fresh fsimage, and tells the active NameNode to fetch it. The active then replaces its old fsimage with the new one. This keeps the standby close to the active state, so it can take over when the active fails. It also replaces the old SecondaryNameNode, CheckpointNode, and BackupNode role of merging edits with fsimage; once Hadoop 2 HA is enabled, those separate services are no longer needed.
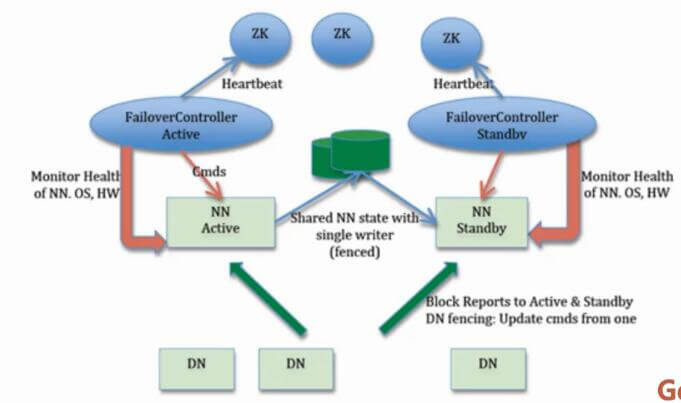
The moving parts are the active NameNode, standby NameNode, ZKFailoverController, ZooKeeper ensemble, shared storage system, and DataNodes. Failover is coordinated by ZooKeeper and ZKFC, while the shared edit log keeps the namespace state close enough for a standby to become active.
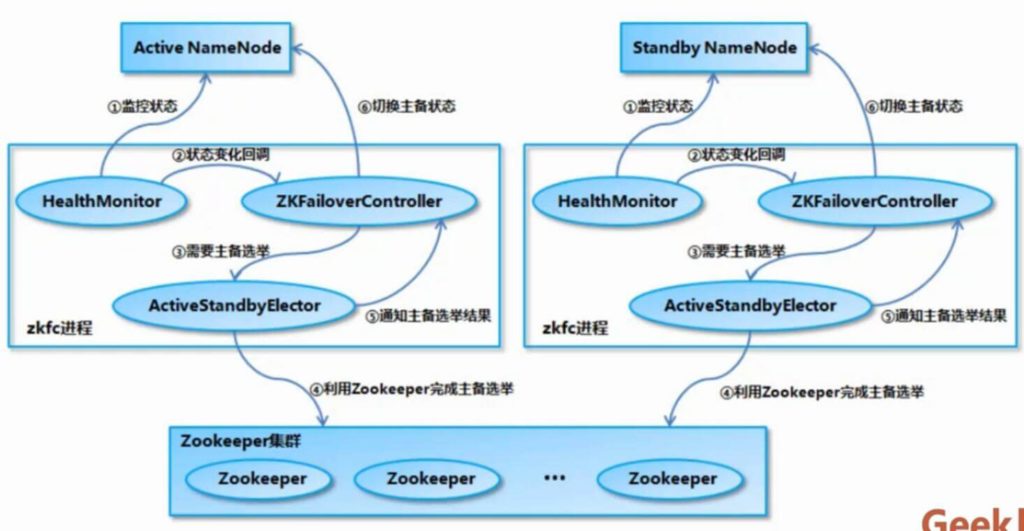
How the standby and active states differ
When a NameNode starts in HA mode, it enters standby first. Its constructor loads the FSImage and EditLog segments to rebuild the in-memory filesystem image. While loading EditLog segments, FSEditLog.initSharedJournalsForRead creates a JournalSet containing only the shared directory on the JournalNode cluster. At this point the NameNode reads edits from JournalNodes, not from the local disk. Only finalized EditLog segments are loaded. Any in-progress segment is handled later during the switch to active, when a recovery step converts it to finalized form before it is read.
After the FSImage and shared EditLog segments are loaded, the NameNode starts the EditLogTailer and StandbyCheckpointer threads and enters standby mode. EditLogTailer periodically pulls edits from the JournalNode cluster. StandbyCheckpointer takes over the old Secondary NameNode role: it performs checkpoints on the standby and uploads the resulting FSImage to the active NameNode.
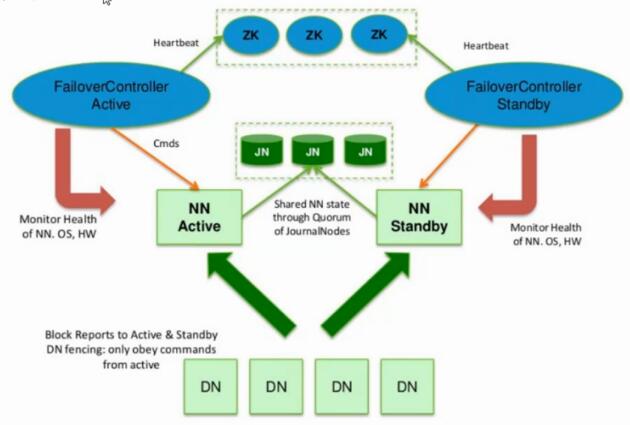
When the standby becomes active, it first stops the standby threads and services, including EditLogTailer and StandbyCheckpointer. It closes the JournalSet used for reading the shared JournalNode directory, then calls FSEditLog.initJournalSetForWrite to reopen the JournalSet with both the local disk directory and the JournalNode shared directory. Next it runs the QJM recovery path: FSEditLog.recoverUnclosedStreams makes the EditLog state consistent across JournalNodes, EditLogTailer.catchupDuringFailover fills any gap in the edit stream, and a new EditLog segment is opened for new writes. The active services and threads then start.
When an active NameNode becomes standby, the order is reversed. It stops active services and threads, closes the JournalSet that reads local disk and JournalNode storage, and calls FSEditLog.initSharedJournalsForRead to reopen a read-only JournalSet for the JournalNode directory. EditLogTailer and StandbyCheckpointer are then started, and EditLogTailer resumes periodic synchronization from the JournalNode cluster.
Lab layout
The example uses three machines. Two are NameNodes, and one is a DataNode. In Hadoop 2.x, the two NameNodes usually sit on separate machines: the active NameNode answers client requests, while the standby is a warm backup. The standby keeps in sync through JournalNodes. ZooKeeper decides which node is active through the master election mechanism.
JournalNodes are lightweight and can share machines with NameNode, DataNode, or ResourceManager processes. Use at least three JournalNodes and an odd number, so the system can tolerate (N-1)/2 JournalNode failures. DataNodes are sized and distributed according to data volume and processing resources; production clusters normally use many DataNodes across many machines.
<table> <thead> <tr> <th>Hostname</th> <th>IP</th> <th>Installed software</th> <th>JPS processes</th> </tr> </thead> <tbody> <tr> <td>hadoop-namenode1</td> <td>192.168.152.153</td> <td>JDK/Zookeeper/Hadoop</td> <td>namenode/zkfc/journalnode/resourcemanager/QuoqumPeerMain</td> </tr> <tr> <td>hadoop-namenode2</td> <td>192.168.152.155</td> <td>JDK/Zookeeper/Hadoop</td> <td>namenode/zkfc/journalnode/resourcemanager/QuoqumPeerMain</td> </tr> <tr> <td>hadoop-datanode1</td> <td>192.168.152.154</td> <td>JDK/Zookeeper/Hadoop</td> <td>datanode//journalnode/nodemanager/QuoqumPeerMain</td> </tr> </tbody> </table>The software versions in the walkthrough are CentOS-7-x86_64-Minimal-1511.iso, jdk-8u101-linux-x64.tar.gz, zookeeper-3.4.8.tar.gz, and hadoop-2.6.0.tar.gz.
Prepare CentOS
Install a minimal CentOS system. The notes use root directly, with a password chosen during setup. After boot, log in as root.
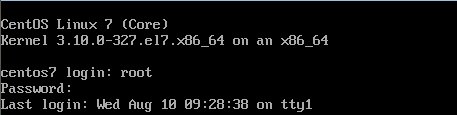
CentOS needs manual network configuration after installation. For a static IP, edit the interface file:
cd /etc/sysconfig/network-scripts/
vi ifcfg-eno16777736
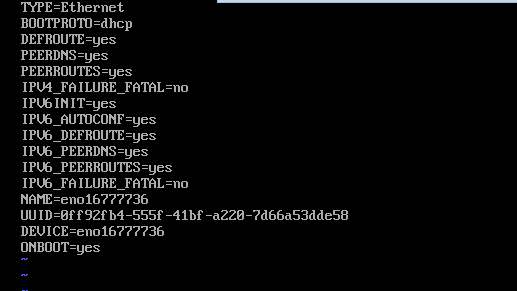
Set the address for each node. The example uses 192.168.152.153 for namenode1; increments the last octet for the other nodes according to the cluster plan.
IPADDR=192.168.152.153 // set the planned IP for this node
service network restart

Set the hostname and verify it:
hostnamectl set-hostname <hostname>
hostnamectl status
Use hadoop-namenode1, hadoop-namenode2, and hadoop-datanode1 as the hostnames. Add hostname-to-IP mappings in /etc/hosts. The sample block below is kept as shown in the notes; make sure hostnames and addresses match your own plan before copying it.
su root
vim /etc/hosts
192.168.152.155 hadoop-namenode1
192.168.152.153 hadoop-namenode2
192.168.152.154 hadoop-datanode1
CentOS 7 minimal may not include a firewall, so the firewall steps can be skipped there. If present, stop and disable firewalld, and disable SELinux.
systemctl stop firewalld.service // stop the firewall
systemctl disable firewalld.service // disable firewall at boot (not installed in this minimal version)
vim /etc/selinux/config
SELINUX=disabled // disable SELinux at boot
Reboot and check SELinux status:
gentenforce
Create the Hadoop user and enable SSH
Create a hadoop group and user, set a password, install vim, and give the hadoop user sudo rights.
groupadd hadoop // create the hadoop group
useradd -g hadoop hadoop // create the hadoop user in that group
passwd hadoop // set the hadoop user password
yum install vim // install vim
vim /etc/sudoers
Add this line in sudoers:
hadoop ALL=(ALL) ALL

Generate an SSH key pair on namenode1 and copy the public key to every cluster node.
su hadoop
ssh-keygen -t rsa
ssh-copy-id hadoop-namenode1
ssh-copy-id hadoop-namenode2
ssh-copy-id hadoop-datanode1
Test passwordless login from each node to the others:
ssh <hostname>
Make sure passwordless SSH works to every other node before continuing.
Upload the installation files
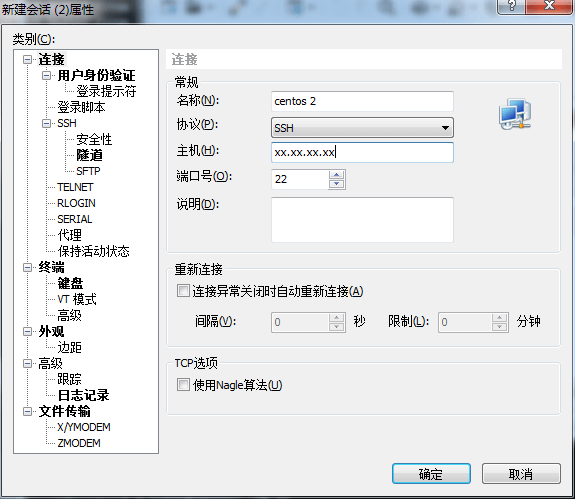
The notes use Xshell to upload files from Windows. Check the Linux IP first:
ip addr // CentOS 7 uses ip instead of the older ifconfig
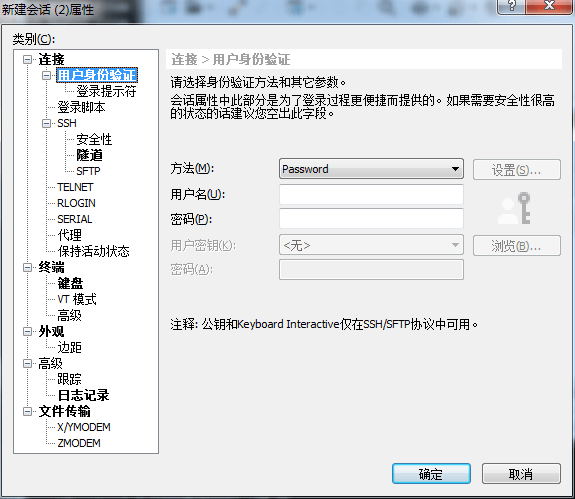
In Xshell, create a connection with the IP address, root user, and password. Accept the host key and connect. Install lrzsz on Linux before uploading:
yum install lrzsz // may require root

Then switch to the hadoop user and upload the Hadoop, ZooKeeper, and JDK archives:
su hadoop
rz
Install JDK
CentOS 7 minimal does not include OpenJDK, so install the JDK archive directly. Create an installation directory, extract the JDK, and set JAVA_HOME in the hadoop user's profile.
mkdir apache
tar -xvf jdk-8u101-linux-x64.tar.gz /home/hadoop/apache/
vim ~/.bash_profile
export JAVA_HOME=/home/hadoop/apache/jdk1.8.0_101
export PATH=$PATH:$JAVA_HOME/bin
source ~/.bash_profile
java -version



Install the ZooKeeper ensemble
Extract ZooKeeper, remove the archive, and set ownership for the hadoop user. Then create zoo.cfg from the sample file and configure the ensemble.
tar -xvf zookeeper3.4.8.tar.gz /home/hadoop/apache/
rm zookeeper3.4.8.tar.gz
chown -R hadoop:hadoop zookeeper-3.4.8
cd apache/zookeeper-3.4.8/conf
cp zoo_sample.cfg zoo.cfg
vim zoo.cfg
tickTime=2000 // client heartbeat interval in milliseconds
initLimit=10 // maximum time for initial heartbeat sync
syncLimit=5 // sync timeout limit
dataDir=/home/hadoop/apache/zookeeper3.4.8/data // data storage directory
dataLogDir=/home/hadoop/apache/zookeeper3.4.8/data/log // data log directory
clientPort=2181 // client port
maxClientCnxns=2000 // maximum number of client connections
server.1=hadoop-namenode1:2888:3888 // ZooKeeper node
server.2=hadoop-namenode2:2888:3888
server.3=hadoop-datanode1:2888:3888
Create the data and log directories, set ownership, and create myid with 1 on the first node.
cd ..
mkdir -p data/log
chown -R hadoop:hadoop data
cd data
chown -R hadoop:hadoop log
echo "1" >> data/myid // change to 2 and 3 on the other nodes after syncing
Copy the ZooKeeper working directory to the other two nodes and set myid to 2 and 3 there.
scp -r zookeeper-3.4.8 hadoop@hadoop-namenode2:/home/hadoop/apache/
scp -r zookeeper-3.4.8 hadoop@hadoop-datanode1:/home/hadoop/apache/
Configure ZooKeeper environment variables on all nodes:
vim ~/.bash_profile
export ZOOKEEPER_HOME=/home/hadoop/apache/zookeeper-3.4.8
export PATH=$PATH:$ZOOKEEPER_HOME/bin
Start ZooKeeper and check the process:
zkServer.sh start
jps
Install and configure Hadoop
On namenode1, extract Hadoop, remove the archive, and set ownership.
tar -xvf hadoop-2.6.0.tar.gz /home/hadoop/apache/
rm hadoop2.6.0.tar.gz
cd apache
chown -R hadoop:hadoop hadoop-2.6.0/
cd hadoop-2.6.0/etc/hadoop/
vim hadoop-env.sh
Set the environment and memory values according to the machine. The sample below follows the notes:
export JAVA_HOME=/home/hadoop/apache/jdk1.8.0_101 // set JDK path
export HADOOP_HEAPSIZE=1024 // set Hadoop heap size
export HADOOP_NAMENODE_OPTS="-Xmx1024m-Dhadoop.security.logger=${HADOOP_SECURITY_LOGGER:-INFO,RFAS} -Dhdfs.audit.logger=${HDFS_AUDIT_LOGGER:-INFO,NullAppender} $HADOOP_NAMENODE_OPTS" // set NameNode memory
export HADOOP_DATANODE_OPTS="-Xmx1024 -Dhadoop.security.logger=ERROR,RFAS $HADOOP_DATANODE_OPTS" // set DataNode memory
export HADOOP_PORTMAP_OPTS="-Xmx1024m $HADOOP_PORTMAP_OPTS" // change to 1024m
export HADOOP_PID_DIR=/home/hadoop/apache/hadoop-2.6.0/pids // set local PID directory
export HADOOP_LOG_DIR=/home/hadoop/apache/hadoop-2.6.0/data/logs // set log output path
Create the directories used by the configuration:
cd /home/hadoop/apache/hadoop-2.6.0
mkdir pids
mkdir -p data/logs
cd etc/hadoop
vim core-site.xml
<configuration>
  <!-- Set the HDFS nameservice to mycluster, matching the HA configuration in hdfs-site.xml -->
  <property>
    <name>fs.defaultFS</name>
    <value>hdfs://mycluster</value>
  </property>
  <!-- Configure the ZooKeeper ensemble and port -->
  <property>
    <name>ha.zookeeper.quorum</name>
    <value>hadoop-namenode1:2181,hadoop-namenode2:2181,hadoop-datanode1:2181</value>
  </property>
  <!-- Set the cache file path and size; this can be larger, in bytes -->
  <property>
    <name>hadoop.tmp.dir</name>
    <value>/home/hadoop/apache/hadoop-2.6.0/data/tmp</value>
  </property>
  <property>
    <name>io.file.buffer.size</name>
    <value>131072</value>
  </property>
  <!-- Set how long HDFS keeps files before permanent deletion, in minutes; 0 disables the trash -->
  <property>
    <name>fs.trash.interval</name>
    <value>10080</value>
  </property>
</configuration>
Configure hdfs-site.xml:
vim hdfs-site.xml
<configuration>
  <!-- Set the HDFS metadata storage path -->
  <property>
    <name>dfs.namenode.name.dir</name>
    <value>/home/hadoop/apache/hadoop-2.6.0/data/namenode</value>
  </property>
  <!-- Set the HDFS data storage path -->
  <property>
    <name>dfs.datanode.data.dir</name>
    <value>/home/hadoop/apache/hadoop-2.6.0/data/datanode</value>
  </property>
  <!-- Set the number of data replicas -->
  <property>
    <name>dfs.replication</name>
    <value>1</value>
  </property>
  <!-- Disable permission checks -->
  <property>
    <name>dfs.permissions.enabled</name>
    <value>false</value>
  </property>
  <!-- Enable WebHDFS, the REST-based interface -->
  <property>
    <name>dfs.webhdfs.enabled</name>
    <value>true</value>
  </property>
  <!-- ////////////// HDFS HA configuration ////////////// -->
  <!-- Set the HDFS nameservice to mycluster -->
  <property>
    <name>dfs.nameservices</name>
    <value>mycluster</value>
  </property>
  <!-- Set the two NameNode IDs for mycluster to nn1 and nn2 -->
  <property>
    <name>dfs.ha.namenodes.mycluster</name>
    <value>nn1,nn2</value>
  </property>
  <!-- Configure the RPC ports for nn1 and nn2 -->
  <property>
    <name>dfs.namenode.rpc-address.mycluster.nn1</name>
    <value>hadoop-namenode1:8020</value>
  </property>
  <property>
    <name>dfs.namenode.rpc-address.mycluster.nn2</name>
    <value>hadoop-namenode2:8020</value>
  </property>
  <!-- Configure the HTTP ports for nn1 and nn2 -->
  <property>
    <name>dfs.namenode.http-address.mycluster.nn1</name>
    <value>hadoop-namenode1:50070</value>
  </property>
  <property>
    <name>dfs.namenode.http-address.mycluster.nn2</name>
    <value>hadoop-namenode2:50070</value>
  </property>
  <!-- Set the JournalNode path for NameNode metadata -->
  <property>
    <name>dfs.namenode.shared.edits.dir</name>
    <value>qjournal://hadoop-namenode1:8485;hadoop-namenode2:8485;hadoop-datanode1:8485/mycluster</value>
  </property>
  <!-- Set the Java class HDFS clients use to reach the active NameNode -->
  <property>
    <name>dfs.client.failover.proxy.provider.mycluster</name>
    <value>org.apache.hadoop.hdfs.server.namenode.ha.ConfiguredFailoverProxyProvider</value>
  </property>
  <!-- Set the fencing mechanism to ssh -->
  <property>
    <name>dfs.ha.fencing.methods</name>
    <value>sshfence</value>
  </property>
  <!-- Set the private key location -->
  <property>
    <name>dfs.ha.fencing.ssh.private-key-files</name>
    <value>/home/hadoop/.ssh/id_rsa</value>
  </property>
  <!-- Set the JournalNode log storage path -->
  <property>
    <name>dfs.journalnode.edits.dir</name>
    <value>/home/hadoop/apache/hadoop-2.6.0/data/journal</value>
  </property>
  <!-- Enable automatic failover -->
  <property>
    <name>dfs.ha.automatic-failover.enabled</name>
    <value>true</value>
  </property>
</configuration>
Configure mapred-site.xml:
cp mapred-site.xml.template mapred-site.xml
vim mapred-site.xml
<configuration>
  <!-- Use YARN as the MapReduce framework -->
  <property>
    <name>mapreduce.framework.name</name>
    <value>yarn</value>
  </property>
  <!-- Set the JobHistory Server RPC address -->
  <property>
    <name>mapreduce.jobhistory.address</name>
    <value>hadoop-namenode1:10020</value>
  </property>
  <!-- Set the JobHistory Server HTTP address -->
  <property>
    <name>mapreduce.jobhistory.webapp.address</name>
    <value>hadoop-namenode1:19888</value>
  </property>
  <!-- Enable uber mode for small jobs -->
  <property>
    <name>mapreduce.job.ubertask.enable</name>
    <value>true</value>
  </property>
  <!-- Set the maximum number of maps in uber mode -->
  <property>
    <name>mapreduce.job.ubertask.maxmaps</name>
    <value>3</value>
  </property>
  <!-- Set the maximum number of reduces in uber mode -->
  <property>
    <name>mapreduce.job.ubertask.maxreduces</name>
    <value>1</value>
  </property>
</configuration>
Configure yarn-site.xml:
vim yarn-site.xml
<configuration>
  <!-- Auxiliary service on NodeManager; set to mapreduce_shuffle to run MapReduce -->
  <property>
    <name>yarn.nodemanager.aux-services</name>
    <value>mapreduce_shuffle</value>
  </property>
  <!-- Configure the Web Application Proxy security proxy to reduce YARN attack exposure -->
  <property>
    <name>yarn.web-proxy.address</name>
    <value>hadoop-namenode2:8888</value>
  </property>
  <!-- Enable log aggregation -->
  <property>
    <name>yarn.log-aggregation-enable</name>
    <value>true</value>
  </property>
  <!-- Set log retention to 7 days in seconds; -1 disables it -->
  <property>
    <name>yarn.log-aggregation.retain-seconds</name>
    <value>604800</value>
  </property>
  <!-- Change the log directory -->
  <property>
    <name>yarn.nodemanager.remote-app-log-dir</name>
    <value>/logs</value>
  </property>
  <!-- Set NodeManager available memory -->
  <property>
    <name>yarn.nodemanager.resource.memory-mb</name>
    <value>1024</value>
  </property>
  <!-- Set NodeManager available CPU cores -->
  <property>
    <name>yarn.nodemanager.resource.cpu-vcores</name>
    <value>1</value>
  </property>
  <!-- ////////////// YARN HA configuration ////////////// -->
  <!-- Enable YARN HA -->
  <property>
    <name>yarn.resourcemanager.ha.enabled</name>
    <value>true</value>
  </property>
  <!-- Enable automatic failover -->
  <property>
    <name>yarn.resourcemanager.ha.automatic-failover.enabled</name>
    <value>true</value>
  </property>
  <!-- Set the YARN HA cluster ID -->
  <property>
    <name>yarn.resourcemanager.cluster-id</name>
    <value>yarncluster</value>
  </property>
  <!-- Set the two ResourceManager IDs -->
  <property>
    <name>yarn.resourcemanager.ha.rm-ids</name>
    <value>rm1,rm2</value>
  </property>
  <!-- Set the hosts for rm1 and rm2 -->
  <property>
    <name>yarn.resourcemanager.hostname.rm1</name>
    <value>hadoop-namenode1</value>
  </property>
  <property>
    <name>yarn.resourcemanager.hostname.rm2</name>
    <value>hadoop-namenode2</value>
  </property>
  <!-- Set the YARN HTTP ports -->
  <property>
    <name>yarn.resourcemanager.webapp.address.rm1</name>
    <value>hadoop-namenode1:8088</value>
  </property>
  <property>
    <name>yarn.resourcemanager.webapp.address.rm2</name>
    <value>hadoop-namenode2:8088</value>
  </property>
  <!-- Set the ZooKeeper address -->
  <property>
    <name>yarn.resourcemanager.zk-address</name>
    <value>hadoop-datanode1:2181</value>
  </property>
  <!-- Set the ZooKeeper state store path -->
  <property>
    <name>yarn.resourcemanager.zk-state-store.parent-path</name>
    <value>/rmstore</value>
  </property>
  <!-- Enable YARN ResourceManager restart -->
  <property>
    <name>yarn.resourcemanager.recovery.enabled</name>
    <value>true</value>
  </property>
  <!-- Store ResourceManager state in ZooKeeper -->
  <property>
    <name>yarn.resourcemanager.store.class</name>
    <value>org.apache.hadoop.yarn.server.resourcemanager.recovery.ZKRMStateStore</value>
  </property>
  <!-- Enable YARN NodeManager restart -->
  <property>
    <name>yarn.nodemanager.recovery.enabled</name>
    <value>true</value>
  </property>
  <!-- Configure the NodeManager IPC port -->
  <property>
    <name>yarn.nodemanager.address</name>
    <value>0.0.0.0:45454</value>
  </property>
</configuration>
Configure the slaves file:
vim slaves
hadoop-datanode1
Create the directories referenced by the configuration:
cd ../..
mkdir -p data/tmp
mkdir -p data/journal
mkdir -p data/namenode
mkdir -p data/datanode
Copy the Hadoop working directory to the other nodes:
scp -r hadoop-2.6.0 hadoop@hadoop-namenode2:/home/hadoop/apache/
scp -r hadoop-2.6.0 hadoop@hadoop-datanode1:/home/hadoop/apache/
Set Hadoop environment variables on all nodes:
vim ~/.bash_profile
export HADOOP_HOME=/home/hadoop/apache/hadoop-2.6.0
export PATH=$PATH:$HADOOP_HOME/bin:$HADOOP_HOME/sbin
source ~/.bash_profile
Initialize and start the cluster
Start ZooKeeper on all nodes:
zkServer.sh start
On hadoop-namenode1, format ZKFC:
hdfs zkfc -formatZK
Start JournalNode on namenode1, namenode2, and datanode1:
hadoop-daemon.sh start journalnode
Format HDFS on hadoop-namenode1:
hadoop namenode -format
Copy the formatted NameNode metadata from namenode1 to namenode2:
scp -r /home/hadoop/apache/hadoop-2.6.0/data/namenode/* hadoop@hadoop-namenode2:/home/hadoop/apache/hadoop-2.6.0/data/namenode/
Start HDFS from hadoop-namenode1:
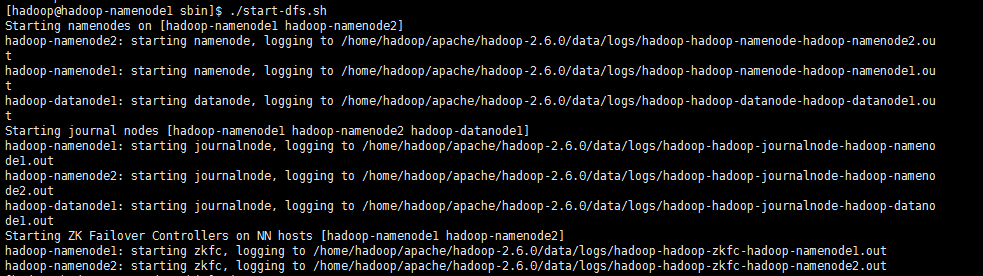
start-dfs.sh
start-dfs.sh starts these processes:
namenode (namenode1/namenode2)
journalnode (namenode1/namenode2/datanode1)
DFSZKFailoverController (namenode1/namenode2)
datanode (datanode1)
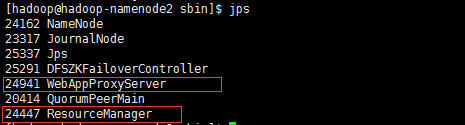
Check processes on all nodes:
jps



Start YARN on namenode2:
start-yarn.sh
This starts ResourceManager on namenode2 and NodeManager on datanode1.

Start the second ResourceManager for YARN failover on namenode1:
yarn-daemon.sh start resourcemanager
Start the YARN security proxy on namenode2:
yarn-daemon.sh start proxyserver
The proxy server acts like a firewall and improves cluster access security.
Start the YARN history server on namenode1:
mr-jobhistory-daemon.sh start historyserver

Check the Web UIs
Open http://hadoop-namenode1:50070. It may show NameNode as standby. Which NameNode is active is decided by ZooKeeper election, and repeated restarts can produce a different result, so avoid unnecessary restarts. In normal production use, servers are not restarted repeatedly, so this has little practical impact.
Open http://hadoop-namenode2:50070. It may show NameNode as active.
The hidden HDFS page http://hadoop-namenode1:50070/dfshealth.jsp is useful for checking HDFS file information. If Browse the filesystem cannot connect, add the Linux hostnames and IPs to the Windows hosts file.
Copy the host entries from Linux:
su
more /etc/hosts/ // copy the hostname and IP entries
Write them into the Windows hosts file:
C:\\Windows\\System32\\drivers\\etc
Open the hosts file with Notepad, paste the entries, and save it.
http://hadoop-namenode2:8088 should show ResourceManager as active. http://hadoop-namenode1:8088 should show ResourceManager as standby and redirect to http://hadoop-namenode2:8088. The history page at http://hadoop-namenode1:19888 shows completed job information.