Getting started
I have a Cat Drive box flashed with Synology DSM. It has already been properly converted and runs reliably, but I never bothered with Synology’s official QuickConnect. Part of that was hesitation, and part of it was the common complaint that QuickConnect is not especially fast anyway.
Without a public IP, I also tried ZeroTier-style NAT traversal. In practice, though, success rates were poor across different carriers, and the speed was underwhelming. In the end, I went with frp.
There are two ways to use frp as a relay: build it on your own server with a public IP, or use a third-party service. I chose the second option for the most obvious reason: cost.
Different platforms may vary a bit, but the setup below was done with SakuraFrp. Its documentation is extensive, yet a few details still caused trouble during the actual process, so this is a record of the pitfalls worth avoiding.
Account registration
Creating an account is straightforward. Some platforms provide nodes inside mainland China, and those may require real-name verification under applicable regulations. If you are fine with overseas nodes—which may not be much slower in real use—you can avoid that requirement on some services.
Prepare DSM first
Before installing anything, make note of the ports DSM is already using.
1. Check the DSM web port
After signing in to DSM, open Control Panel → Network → DSM Settings and note the DSM port numbers. By default, HTTP uses 5000 and HTTPS uses 5001.
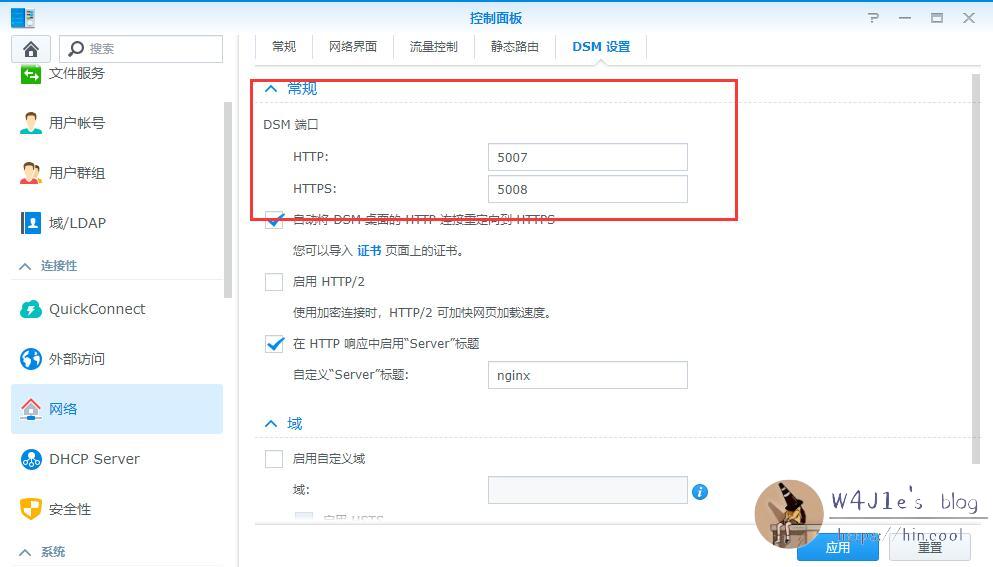
It is better to expose HTTPS rather than HTTP for two reasons. First, some nodes block HTTP traffic. Second, exposing the plain HTTP endpoint can create avoidable trouble.
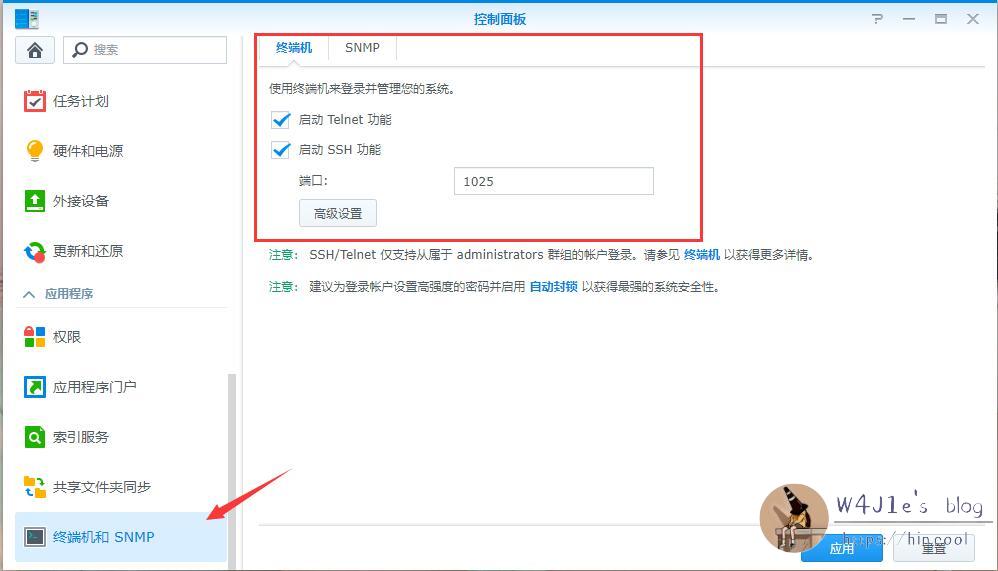
2. Enable SSH
Go to Control Panel → Terminal & SNMP, enable SSH, and note the SSH port. The default is 22.
Installing frpc
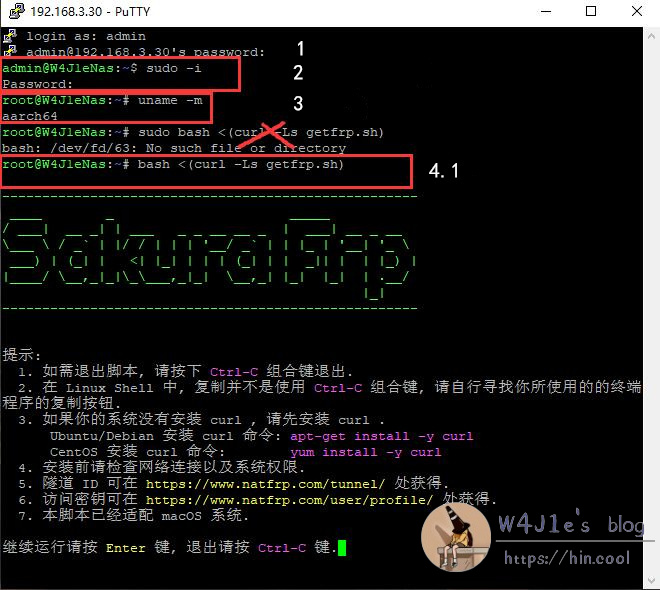
1. Connect over SSH
Use any common SSH client such as PuTTY. On the first login you may get a security prompt; it is fine to proceed. Click Open, then enter your DSM username and password. The password will not be shown while typing.
2. Switch to root
Run the following command:
sudo -i
Enter your password again. If it works, the prompt will change from your admin account to root before the NAS name.
3. Confirm the system architecture
Run:
uname -m
On this Synology setup, the architecture is aarch64. For other devices, check the appropriate frp documentation before downloading anything.
4. Install frpc
There are two installation methods. The second one is recommended here.
Method 1: one-command installer
If you already switched to root in the previous step, you do not need sudo.
sudo bash <(curl -Ls getfrp.sh)
This method is simple and includes Chinese prompts, but it did not install successfully in my case, so I moved on to method 2.
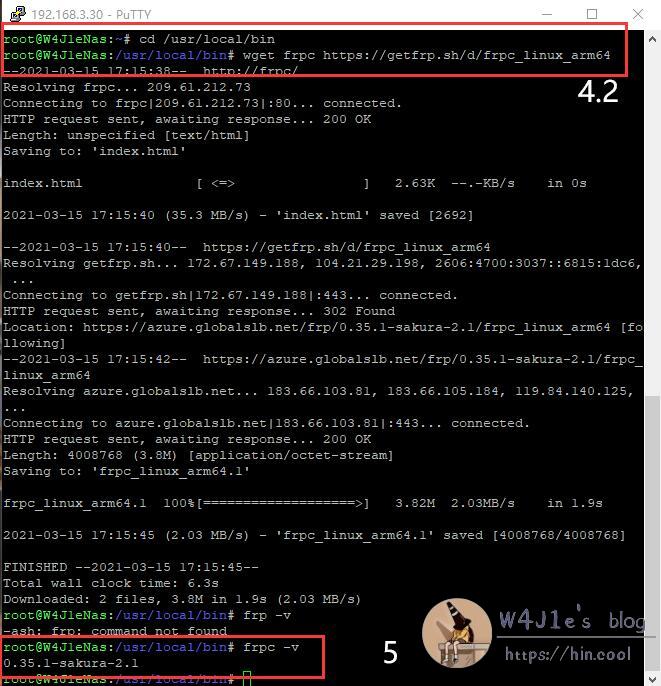
Method 2: download the binary manually
Go to /usr/local/bin and download the file. On this ARM64-based Synology device, the following two commands can be used in order:
cd /usr/local/bin wget -O frpc https://getfrp.sh/d/frpc_linux_arm64
Be careful here: after wget, it is a hyphen followed by the letter O, not zero. In some fonts used in the documentation, the two look almost identical, and that small detail can waste a lot of time.
5. Set permissions and verify the file
If you are already root, sudo is optional here too:
sudo chmod 755 frpc sudo ls -ls frpc md5sum frpc /检查文件MD5是否一致
6. Confirm that frpc works
Run:
frpc -v
If it prints the corresponding version number, the installation succeeded.
Create the tunnel
Choose a relay node based on your network conditions. If you use more than one carrier—for example, home broadband from one provider and mobile data from another—a multi-line node is usually the safer choice.

When creating the tunnel, set the local port to the DSM HTTPS port you noted earlier, which is 5001 by default. For the remote port, letting the platform assign one automatically is usually better, because a manually entered port may already be in use.
Set up frpc as a service
DSM 5 / DSM 6
Most of these devices are likely running DSM 6. In the SSH client, execute:
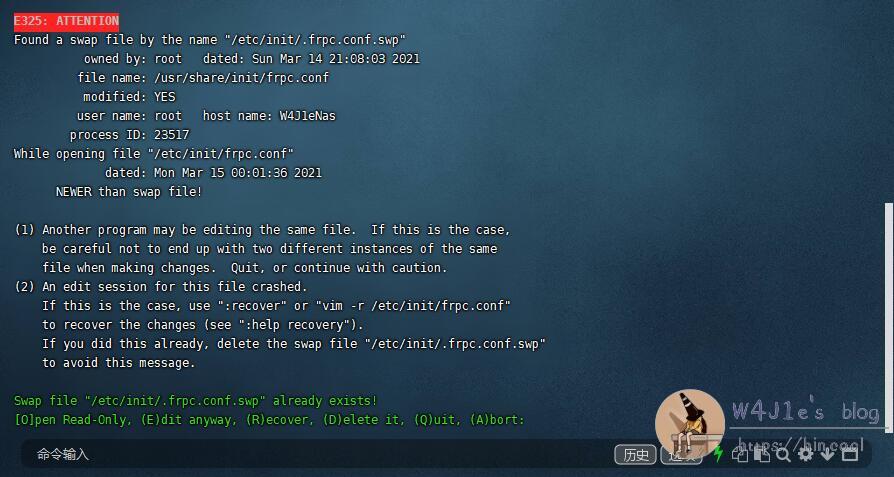
vim /etc/init/frpc.conf
Then:
- Press
Eto enter edit mode. - Press
i. You should see--INSERT--or the equivalent insertion prompt in the lower-left corner.
- Paste the following content. Replace the startup parameter with your own access key plus tunnel ID.
description "SakuraFrp synology frpc service" author "FENGberd" start on syno.network.ready stop on runlevel [016] respawn respawn limit 0 5 exec /usr/local/bin/frpc -f 这里替换成您的启动参数 如xxx:1234
- Press
Esc, then type:wqto save and exit.
Test whether the service starts correctly
Run the following commands to test frpc. Do not include the # symbols themselves:
# start frpc # tail /var/log/upstart/frpc.log
If the expected messages appear in the log, frpc has been installed successfully and is running normally.
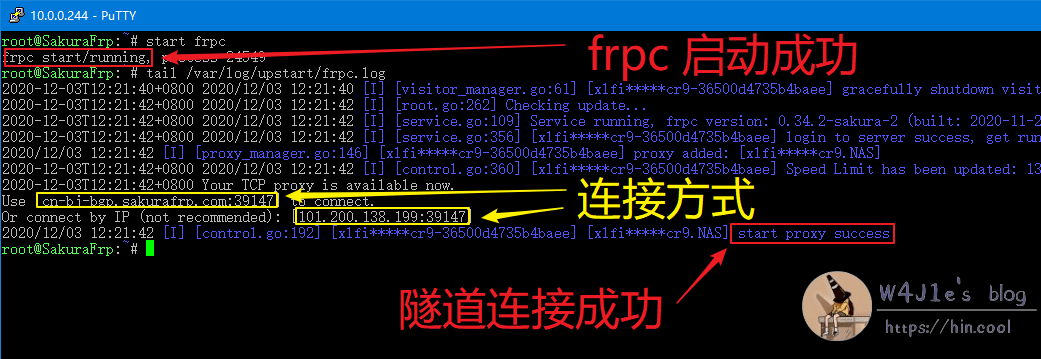
At that point, DSM should be reachable through:
https://node-domain:remote-port
You can also use the connection method shown in the log, but using the node’s domain name is generally more convenient.
Bind your own domain
The domain name provided by the platform is often long and hard to remember. If you already have your own domain, you can point it to the node domain with a CNAME record.
Using Tencent Cloud as an example, add a CNAME record whose value is the node domain:

Tencent Cloud can also provide a free SSL certificate, which helps ensure HTTPS access works properly with your custom domain.
A few practical notes
I avoided frp for a long time because the documentation made it look more complicated than it really is. During setup it still felt that way at moments—especially with the -O detail in wget, and with repeated failed installs or even downloading the wrong build and cleaning it up afterward.
Once everything is configured, though, the whole thing is not nearly as difficult as it first appears. If you need remote access to a Synology NAS but do not have a public IP, frp—especially a self-hosted deployment if you can manage it—is a very solid option.