The workflow described here connects three pieces of software in sequence: MATLAB communicates with STK, STK produces simulation data, and MATLAB then writes the returned data into SQL Server. In practical terms, MATLAB is used as the control layer. It sends the initial parameters to STK, retrieves the generated satellite position and velocity data, and finally stores those results in a database.
The software versions used in this setup are:
- MATLAB 2014a
- STK 11.2
- SQL Server 2019
Installation order and basic connection
Install the software in the following order:
- MATLAB
- STK
- SQL Server
This order helps avoid connector and path configuration issues later, especially when installing the STK MATLAB connector.
MATLAB 2014a
Install MATLAB 2014a first. After installation, it will later be used both to control STK and to connect to SQL Server.
STK 11.2 and the MATLAB connector
During STK installation, the component selection page contains several optional modules. In this setup, all checkboxes are selected, because future projects may need different STK components. If a full installation is not desired, at minimum the Matlab Connectors component must be selected. This connector is required for MATLAB to communicate with STK.
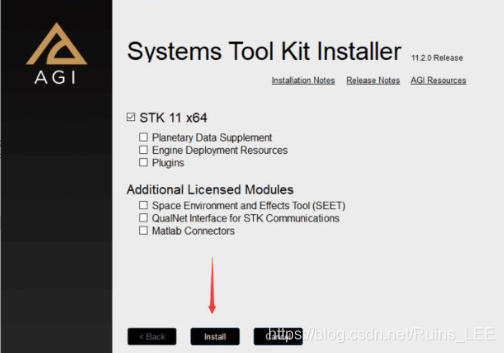
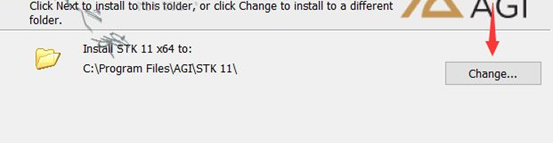
Continue through the installation wizard by clicking Next and accepting the agreements. When choosing the installation directory, it is not necessary to install STK on the C drive. Installing it on another drive works normally as well.
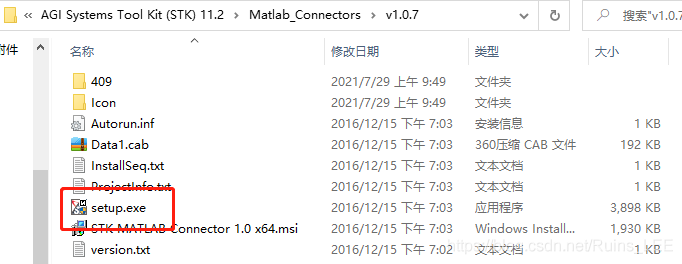
After STK 11.2 is installed, install the MATLAB connector included with the STK installation package. Open the Matlab_Connectors folder and run setup.exe to complete the connection setup between MATLAB 2014a and STK 11.2.
STK 11.2 supports the following MATLAB versions:
- R2008a (7.6)
- R2010a (7.10)
- R2010b (7.11)
- R2011a (7.12)
- R2011b (7.13)
- R2012a (7.14)
- R2012b (8.0)
- R2013a (8.1)
- R2013b (8.2)
- R2014a (8.3)
- R2014b (8.4)
- R2015a (8.5)
- R2015b (8.6)
- R2016a (9.0)
- R2016b (9.1)
At this point, the basic connector installation between MATLAB 2014a and STK 11.2 is complete.
Next, open MATLAB 2014a and add the following two folders to the MATLAB path:
C:\ProgramData\AGI\STK MATLABD:\Program Files (x86)\AGI\STK 11\bin\Matlab
The ProgramData folder on the C drive is hidden by default. To view it in Windows Explorer, enable Hidden items under the View menu.
The second path should be adjusted according to the actual STK installation directory on your own computer. The Matlab folder under the STK installation path contains MATLAB .m files provided by AGI. Once the path is added, these files can be called directly in MATLAB, similar to using a MATLAB toolbox.
Testing the MATLAB–STK connection
Open MATLAB 2014a and run:
stkInit;
If the command line displays the corresponding STK initialization information, the connection between MATLAB 2014a and STK 11.2 has been established successfully.

SQL Server 2019
Download SQL Server 2019 Express from the official Microsoft website. An internet connection is required during download and installation. After SQL Server 2019 Express is installed, install SSMS as well. When the SQL Server installation finishes, it may open a webpage for downloading SSMS; install it from there.
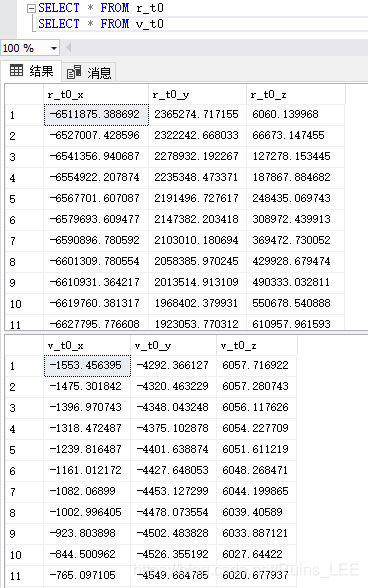
Before running the MATLAB script below, create the corresponding database and tables in SQL Server.
In this example:
- Database name:
mydb - Table names:
r_t0andv_t0 - Table
r_t0contains three columns: r_t0_xr_t0_yr_t0_z- Table
v_t0contains three columns: v_t0_xv_t0_yv_t0_z
Running the simulation and writing data to SQL Server
Open MATLAB 2014a, STK 11.2, and SQL Server 2019. Then create a new MATLAB script and enter the following code.
The script first connects MATLAB to STK, creates a scenario, defines the simulation period, creates a satellite, sets orbital parameters, retrieves the satellite position and velocity, and then writes those values into SQL Server.
A key detail in the orbital setup is the unit convention: the angular values used in the satellite orbital elements are in radians. Do not accidentally use degrees in places where radians are required.
%%%%%%%%%%%%%%%%%%%%%%%%%%%%%%%%%%%%%%%%%%%%%%%%%%%%%%%%%%%%%%%%%%%%%%%%%%
%  功能说明: Matlab与STK互联
%%%%%%%%%%%%%%%%%%%%%%%%%%%%%%%%%%%%%%%%%%%%%%%%%%%%%%%%%%%%%%%%%%%%%%%%%%
%% 1.初始化需要的接口函数
stkInit;                                % 建立连接
remMachine = stkDefaultHost;
conid = stkOpen(remMachine);            % 得到连接句柄(用于发送指令)
% 判断场景是否存在
scen_open = stkValidScen;
if scen_open == 1
    rtn = questdlg('Close the current scenario?')
    if ~strcmp(rtn,'Yes')
        stkClose(conid);
        return;
    else
        stkUnload('/*');
    end
end

%% 2.建立场景、航天器和观测站
% 建立场景
disp('创建场景中......');
disp('-------------------------');
h = waitbar(1,'创建场景中......','name','Matlab/STK仿真演示平台');
stkNewObj('/','Scenario','TestScenario');
pause(1);
close(h);

% 设定场景时间
disp('设定场景时间......');
disp('-------------------------');
h = waitbar(1,'设定场景时间......','name','Matlab/STK仿真演示平台');
% 设定场景开始时间
% startDate = '27'; startMonth = 'Nov'; startYear = '2019';
% startHour = '00'; startMin = '00';     startSec = '00.000';
% strStartTime = strcat(startDate,32,startMonth,32,startYear,32,startHour,':',startMin,':',startSec);% 逗号之间的“32”代表“空格”之意
strStartTime = '27 Nov 2019 00:00:00.000';

% 设定场景结束时间
% stopDate = '27'; stopMonth = 'Nov'; stopYear = '2019';
% stopHour = '02'; stopMin = '00'; stopSec = '00.000';
% strEndTime = strcat(stopDate,32,stopMonth,32,stopYear,32,stopHour,':',stopMin,':',stopSec);% 逗号之间的“32”代表“空格”之意
strEndTime = '28 Nov 2019 02:00:00.000';
stkSetTimePeriod(strStartTime,strEndTime,'GREGUTC');
stkSetEpoch(strStartTime,'GREGUTC');
stkSyncEpoch;
pause(1);
close(h);

% 设定场景动画开始时间
strQuteBegTime = ['"' strStartTime '"']; % 时间写入命令是得加双引号,比较刻板
rtn = stkConnect(conid,'Animate','Scenario/TestScenario',['SetValues ' strQuteBegTime ' 10 0.1']);
% 下面这个用来参考格式
% rtn = stkConnect(conid,'Animate','Scenario/TestScenario','SetValues "27 May 2019 06:14:00.000" 60 0.1');
% 设定动画时间回到起始点
rtn = stkConnect(conid,'Animate','Scenario/TestScenario','Reset');

% 建立航天器
disp('建立航天器......');
disp('-------------------------');
stkNewObj('*/','Satellite','AoXiangI');

h = waitbar(1,'建立航天器......','name','Matlab/STK仿真演示平台');
pause(1);
close(h);

%% 3.设定星座中各卫星的属性
%--------------------------------------------------------------%
%               注意:这里的单位都是弧度(rad)
%                     千万别用错单位!
%--------------------------------------------------------------%
disp('仿真运行中......');
disp('-------------------------');
rtn = stkConnect(conid,'Animate','Scenario/TestScenario','Start End');
d2r = pi/180;
% 卫星积分起止时间、轨道历元时间、步长
t_start=0; t_stop=2*60*60; orbitEpoch=t_start; dt=10;
tSimu = t_start+1:t_stop/dt;
% 卫星初始轨道根数
a = 6928.137*1000;  e = 0.0; i = 53.0*d2r;
w = 0*pi/180; Raan = 160*pi/180; M = 0*d2r;

% 设置卫星轨道属性
stkSetPropClassical('*/Satellite/AoXiangI','J2Perturbation','J2000',t_start,t_stop,dt,orbitEpoch,a,e,i,w,Raan,M);
% 设置卫星姿态属性(下面写的这个是错的)
Qua = [sqrt(2)/2;0;0;sqrt(2)/2];  QuaMat = repmat(Qua,1,length(tSimu));
stkSetAttitudeCBI('*/Satellite/AoXiangI','AoXiangI',tSimu,QuaMat);
tic;
h = waitbar(0,'仿真运行中......','name','Matlab/STK仿真演示平台');
global satPos satVel
satPos = zeros(t_stop/dt,3);
satVel = zeros(t_stop/dt,3);
time   = zeros(1,t_stop/dt);
k = 1;
for t = 1:dt:t_stop
    [satPos1,satVel1] = stkPosVelCBI('*/Satellite/AoXiangI',t);
    satPos(k,:) = satPos1;
    satVel(k,:) = satVel1;
    waitbar(k/(t_stop/dt));
    k = k+1;
end
pause(0.5);
close(h);
toc;
msgbox('仿真结束,请查看结果!','Matlab/STK仿真演示平台');
stkClose(conid);

%%
%%%%%%%%%%%%%%%%%%%%%%%%%%%%%%%%%%%%%%%%%%%%%%%%%%%%%%%%%%%%%%%%%%%%%%%%%%
%  功能说明: Matlab与STK互联
%%%%%%%%%%%%%%%%%%%%%%%%%%%%%%%%%%%%%%%%%%%%%%%%%%%%%%%%%%%%%%%%%%%%%%%%%%
%%
% 建立MATLAB与SQL的连接
conn = database('mydb','','');

% 删除数据库中原来的数据
curs_r = exec(conn,'delete from r_t0');
curs_v = exec(conn,'delete from v_t0');

% 向数据库中存储数据
satPara = zeros(k-1,6);
satPara(:,1:3) = satPos;
satPara(:,4:6) = satVel;
% 得到矩阵的行列
[row,col] = size(satPara);
% 插入数据
satParaCell = cell(row,col);
for i = 1:row
    for j = 1:col
        satParaCell(i,j) = num2cell(satPara(i,j));
    end
end
colname_r = {'r_t0_x','r_t0_y','r_t0_z'};
insert(conn,'r_t0',colname_r,satParaCell(:,1:3));
colname_v = {'v_t0_x','v_t0_y','v_t0_z'};
insert(conn,'v_t0',colname_v,satParaCell(:,4:6));

% Again
curs_r = exec(conn,'delete from r_t0');
curs_v = exec(conn,'delete from v_t0');
colname_r = {'r_t0_x','r_t0_y','r_t0_z'};
insert(conn,'r_t0',colname_r,satParaCell(:,1:3));
colname_v = {'v_t0_x','v_t0_y','v_t0_z'};
insert(conn,'v_t0',colname_v,satParaCell(:,4:6));

% 关闭连接
close(curs_r);
close(curs_v);
close(conn);
After the MATLAB script finishes running, check SQL Server to confirm that the simulation data has been written into the database.
Run the following SQL queries:
SELECT * FROM r_t0
SELECT * FROM v_t0
If the tables return the position and velocity records, the MATLAB-to-SQL data writing step is working correctly.